Congratulations on purchasing your new Hydraulic Stuffer!The first thing is to remove the panel on the housing on the left side of the stuffer. That's the side closest to the 1 - 1 switch that turns on the motor. You can also recognize because of the blue tape on it. Inside you will find the motor mounted on the oil resevior. There is a cap that allows you to refill the oil tank. Loosen the cap so that you can turn it with your fingers and leave it. This will allow the pressure in the tank to stabilize as the oil flows in and out of the tank. Just to the left of the fill plug is the pressure adjustment knob that regulates the pressure and speed of the piston. It is graduated with numbers. Most users like lower numbers because that means lower pressure with more speed. Bigger numbers mean more pressure but less speed. Let's leave that alone for now. It doesn't make sense to adjust it until you have meat in the machine anyway. On the dashboard on the left is the switch. Turning to either "1" position turns on the power. Nothing will happen until the knee switch is pushed. Just to the right of this switch is the safety button. It disables the knee switch. You may need to turn it to the right so that it can pop up. To the right of the safety button is the speed control. This control has a lot of travel but in actuality only the last turn clockwise is effective. As a matter of fact, if it is turned to the stop in a clockwise direction, it will stop the piston completely and most likely kick out the breaker which is behind the panel on the right side of the housing. As you become more familiar with this machine, you may want to adjust this speed control and the pressure knob to get just exactly the sausage stuffer you want. We prefer to turn it counter-clockwise (left) all the way and do all the adjustment from the pressure adjustment. On the oposite side of the control panel is the piston control. You will notice that there is a rocker switch with "up" and "down" Use "Down" to lower the piston to refill the stuffer. Next to the up/down switch is the portioner control. It has "timed" and "untimed" positions. You will need to press the knee switch on "untimed" and "down" to lower the piston. To use the portioner, set the switches to "timed" and "up" and set the time on the dial to the right of the switch. Obviously, you can set the timer dial to make whatever size sausage you need to make and it just takes a tap on the knee switch to do that.. You will notice that the piston will reverse itself when you release the knee switch. This is caused by the control in the picture below. You increase the amount of reversal by turning the knob clockwise and decrease it by turning it counter-clockwise. It only needs to be turned about 1/8" for most uses. 
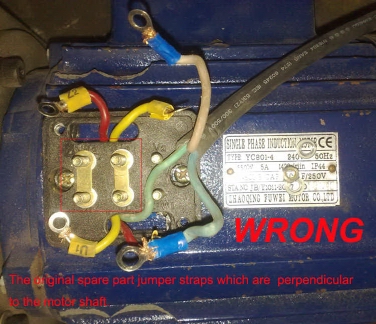
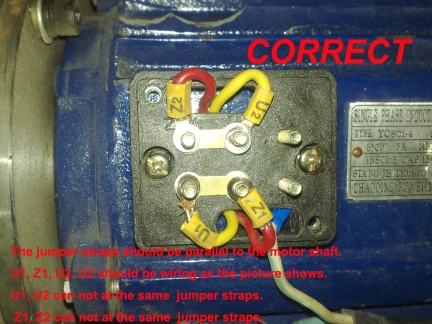
The first thing you will want to do is remove the stuffer lid and remove any parts that are found inside. This is a good time to wash the parts that will be touching food. It's a good idea to spray food-grade silicon spray to the inside of the cylinder down close to the piston so that the o-rings get lubricant on them. We really recommend silicon spray here. Some machines are shipped with an oil that gets really sticky. It can cause problems if the piston is moved downward without lubrication. The bolts can strip out of the plastic piston and it will be torn off the mounting plate if the o-rings stick to the sides of the cylinder. So we lubricate the cylinder walls and when you get the lid back on put the switch on 1 and push up the piston and get the o-rings oily. If you push up the piston to about half way, it becomes much easier to remove the cylinder to clean it. Once the piston is up halfway in the cylinder, remove the nuts that hold the lid and the lid. Now put the switch on 1 again and push the piston up a little more. The cylinder will move up with the piston. Now you will be able to tilt the cylinder to the side and remove it from the machine. Wash it and the piston and put a light coat of silicone on the o-rings and the inside of the cylinder wall. Issues we have noticed.If nothing happens when you push the knee switch and the motor is running, the safety button may be engaged. It is the button just to the right of the 1 - 2 switch. Turn it clockwise about a quarter turn and let it pop up. If that doesn't work, it is possible that the speed control to the right of the safety button may be closed. If it will not turn to the right, it is closed and will stop the piston from going up. Turn it counter clockwise at least 2 turns. On our newer models with the timed portioner, it is possible that the rocker switch is on "timed" and the timer is set on "0". If it still doesn't move the piston then you may have electrical failure. To see if you have electrical failure, open the left side panel. There is a bar there with two clear plastic boxes. One will light up when you attempt to go up and the other will light up when you try to go down. If neither side lights then the most obvious is the knee switch. It is controlled by the relay next to the reverse timer behind the right panel. If it has smudges in the clear plastic case near the contacts, it needs replacing. You can also watch it if it moves when you press the knee switch when everything is on. If it doesn't move, check to see if the knee switch makes and breaks the circuit when it is activated. Next, it's possible that the transformer has failed. The low side of the transformer should provide 24-28 volts A.C. Sometimes the meat will come out too fast or not fast enough. This is controlled by the pressure and speed control valve inside the panel on the left side. This control must be adjusted very carefully. I recommend turning the knob only 1/4 turn at a time and then testing the flow. (By the way, adding cold water to your sausage is approved for sausage making. It's especially important when making snack links) It looks like this. 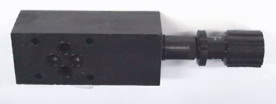 And it's located here 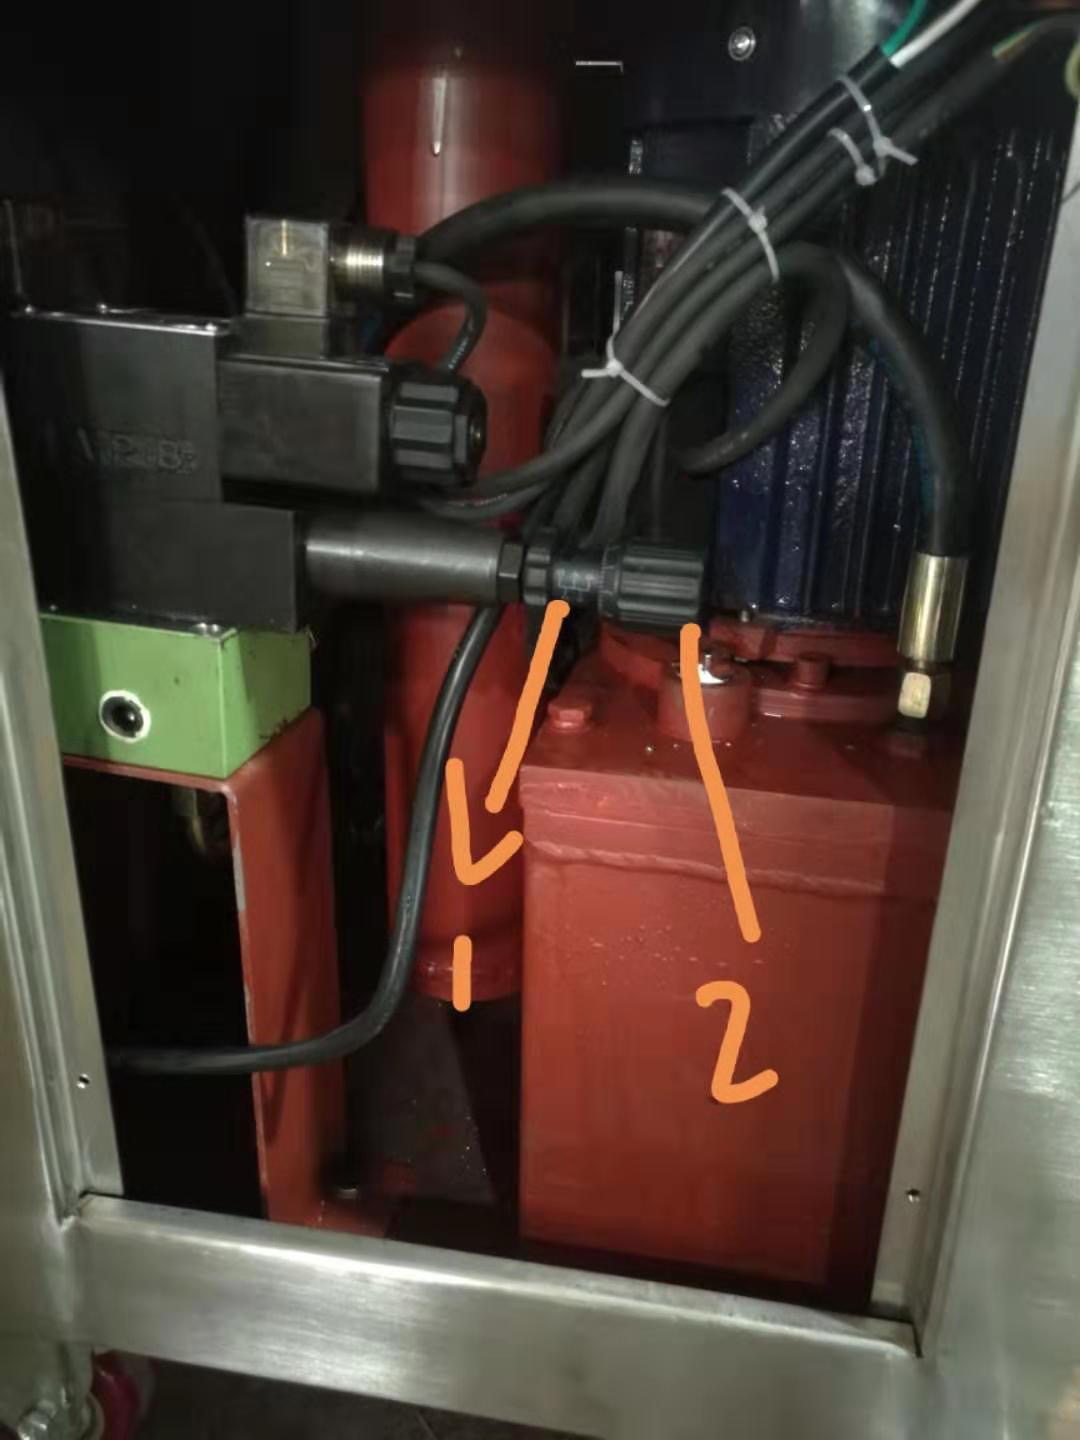 There is a lock ring on the valve control that must be loosened. When it is loosened, the knob can be turned clockwise to increase the pressure and counter-clockwise to lower the pressure. When you have it adjusted properly, tighten up the lock ring. You can cause extreme pressures by turning the knob too far clockwise and so I suggest that once you have adjusted the pressures - leave off the panel so that you can check the temperature of the big blue motor that sits above the fluid reserviour. If it is too hot to leave your hand on it, it is ready to burn up. Turn off the machine immediately and let it cool off. Once it's cooled, you can turn the control knob counter-clockwise a half turn at a time until the motor runs at a comfortable temperature. There is a lock ring on the valve control that must be loosened. When it is loosened, the knob can be turned clockwise to increase the pressure and counter-clockwise to lower the pressure. When you have it adjusted properly, tighten up the lock ring. You can cause extreme pressures by turning the knob too far clockwise and so I suggest that once you have adjusted the pressures - leave off the panel so that you can check the temperature of the big blue motor that sits above the fluid reserviour. If it is too hot to leave your hand on it, it is ready to burn up. Turn off the machine immediately and let it cool off. Once it's cooled, you can turn the control knob counter-clockwise a half turn at a time until the motor runs at a comfortable temperature.When the pressures are high, the breaker can kick out. It can be reset by opening the opposite panel and looking for a small black pushbutton and clicking it in. It popped out for a reason. The motor is probably over-heating. Continued restarting the motor under these conditions will destroy the motor. If the motor doesn't turn on, It is most likely the 1-2 switch. You can double check by jumping 120 volts directly to the motor with a cord. If the motor runs, replace the switch. If it doesn't run, replace the motor. A big job! Wiring diagram for New Sausage Stuffers w/ Improvements Wiring diagram for Older and some other brands of Hydraulic Sausage Stuffers Hydraulic diagram for 50 lb. Sausage Stuffers Check the jumper straps on your replacement motor. The straps must run parallel to the motor shaft.
Motor wiring instructions Motor: blue wire connects with U1, brown wire connects with U2, double color wire connected with ground wire. switch wiring instructions: Electric switch: blue wire connects with electric switch marked 11, brown wire connects with electric switch marked 4, double color wire grounds with housing. 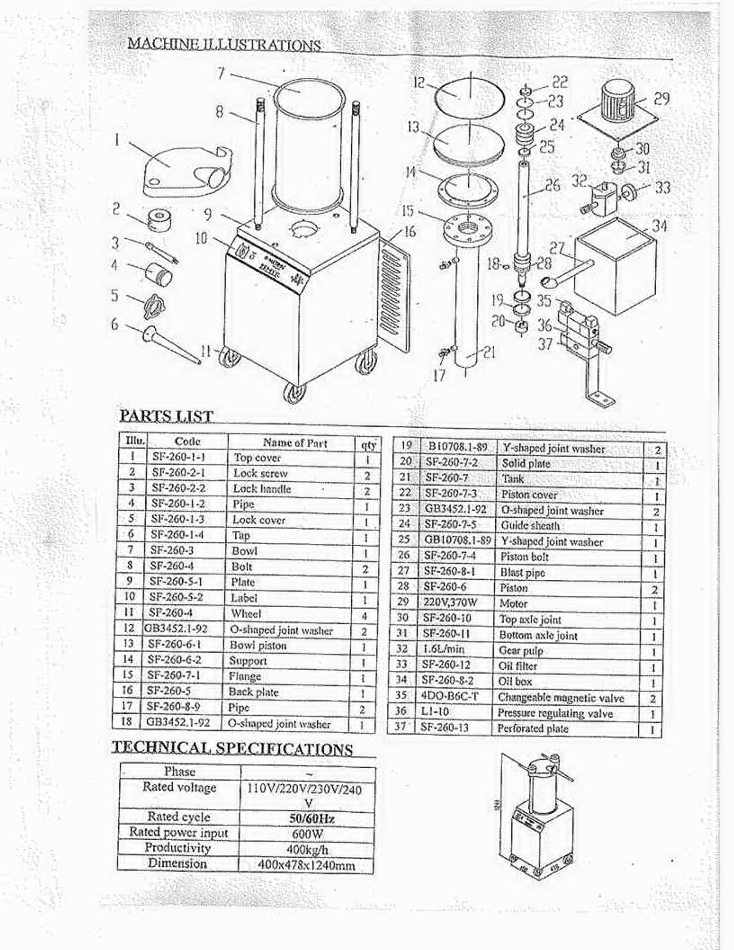
Easy driving distance from San Antonio, Dallas - Fort Worth, Corpus Christi, Austin, Waco and Houston, Texas. We are a one to two hours drive from these other fine Texas communities too: Seguin, Fredericksburg, Kerrville, New Braunfels, Flatonia, El Campo, Victoria, Needville, Hallettsville, Conroe, Schulenburg, Weimer, Huntsville, Sugarland, Pasadena, Rosenberg, Bellville, Fayetteville, Katy, College Station, Bastrop, Warrenton, Sealy, LaGrange, Brenham, Cypress, Wharton, Rosenberg and The Woodlands.
Click here for a map to find us. Are you outside these Texas communities? No problem, just order online. ProProcessor is committed to saving you money on meat processing equipment and supplies. You can buy meat mixers, electric meat grinders, meat slicers, meat saws, bowl choppers, cutting tools, patty makers, meatball making machines, commercial vacuum sealers, tenderizers, tables and sinks for all your meat processing needs. We have everything you need for meat handling, game processing, meat curing, and jerky. Home Meat Processing Vegetable Processing Dough Processing Mixers Packaging Cooking Serving Catering Bowl Cutters Concessions Your Order About Us Site Map xml Site Map xml Video Site Map 
|